how to draw 1d in 3d
How to Draw with a 3D Pen?
Drawing in 3D may seem daunting at get-go, but that's only because it'south new. There is a learning curve, but with a bit of practice and with the tips and tricks in this guide, we promise you'll find using a 3D pen to exist second nature in no time!

Start with 2D
Cartoon in 3D for a beginner starts with… await for information technology… 2D. To help yous get used to the speed of the pen and the way the different plastics behave, we suggest kicking off with drawing in 2D. Cull a clean, flat surface like a slice of paper.
Now catch a pencil and draw something simple on the paper (some lines and basic shapes would work bully), or print out this stencil.
Browse our Stencil Library

Step ane
Place the tip of your 3D pen at the starting point of your stencil and brand sure it is touching the paper. Engage the feed mechanism, and extrude a small dewdrop of plastic. This piffling bead is what we telephone call an "anchor betoken", because information technology volition hold your Doodle to the newspaper.

Step 2
As you continue to trace along the stencil, try to keep the extruded plastic as close equally you can to the paper. To stop Doodling, printing the feed button button in one case, gently push down to form the ending point, wait ii-iii seconds, then pull your pen away.

Step 3
In order to join two pieces together, simply extrude some plastic for at the place where you desire to merge the pieces to "weld" them into one piece.

Step four
Once y'all're done Doodling, allow the plastic to fully cool and harden for a few seconds, then gently pare it off the surface.

Draw Freehand in 3D
Once you're confident cartoon in 2D, it's time to level up! Drawing freehand in the air gives you lot a whole new globe of creative possibilities (and also makes people go "wow").
Once y'all feel comfortable with this technique, challenge yourself to this uncomplicated 3D Canis familiaris Putter!

Pace 1
Get-go with Doodling a dot on a piece of paper, making sure it'south well anchored to the surface.

Footstep two
Slowly elevator the pen into the air while extruding, moving your pen at the same speed as the extrusion. The control of speed that you lot move your hand with is the trickiest part of drawing with a 3D pen, and volition brand or break your design. Take your time to practice and master this technique.

Step 3
When you lot have stopped the extrusion, hold the pen still for a few seconds to allow the plastic to solidify, then gently pull the pen abroad.

Step four
Utilize the aforementioned technique to draw curves or spirals by moving your pen in the appropriate direction. Doodle in Slow mode until you get a good hang of this technique. ABS plastic is easier to control for drawing in the air.

Get together and Build a 3D Object
Looking to make truly killer 3D objects? Doodling freehand in the air works great and is definitely a lot of fun, but there are also other handy techniques that you tin can effort out as you take on different projects.
In this section, nosotros look at how you tin can get together a three-dimensional object using Doodled 2D parts (a little like building with Lego blocks), every bit well every bit how you tin can make your own molds.
Build a Cube
A groovy style to do assembling your Doodles, particularly larger or more intricate ones, is past edifice a cube. You can use the same technique to go across 3D cubes to create almost any structure.

Footstep 1
On a slice of paper, draw a 3x3cm square. Putter to create half dozen two-dimensional square pieces.

Stride ii
Place the bottom slice flat on your piece of work surface, and so concord up a side slice so that it'southward propped upwards against the lesser piece.

Step 3
Utilise a flake of plastic at the corners where the pieces meet to concur information technology in place. Then Doodle along the entire joint to secure information technology.

Step 4
Repeat for each side of the cube, and you're washed!
Build a Sphere
When creating a circular shape like a sphere, we recommend using a mold to get that perfect 3D shape. Your molds tin can be made out of rolled upwardly paper and masking record, or you can utilise and recycle items you lot already have at home!

Step i
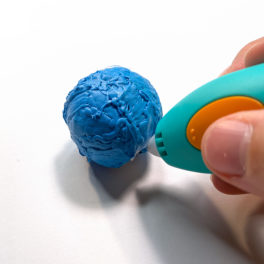
Get started by using a ping pong ball (or some other small ball) equally your 3D mold. Doodle a line around the middle of the ball, and work your way toward one end to create a semi-sphere.

Stride 2
Leaving a little space, Doodle some other semi-sphere on the other side of the ball.

Step 3
Use the file from a pair of blast clippers or scissors to slide around the within of each semi-sphere to pop them off the ball. They should come up off easily once they're a fiddling loose!
Step 4
Add some plastic to bring together the two semi-spheres together to course a whole sphere!
Make a Figurine
When making more complex structures like a figurine or creature, y'all tin can build your ain molds with paper, masking record, and a few household items.
Step one
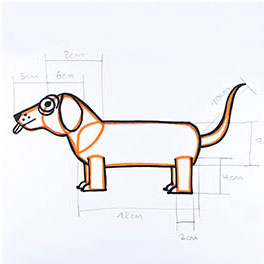
Sketch out your character and draw simplified shapes onto each body part (eastward.g: a circumvolve for a head, rectangle for body, etc..). Write down the crude measurements for each of these shapes.

Pace 2
Find objects that match these basic shapes (e.thou. a pencil, rolls of paper, ping pong ball). If y'all can't discover objects in the right shapes scrunch up some paper into the desired shape. Wrap each of your molds with masking tape before Doodling onto the surface.

Pace 3
Doodle onto half of each shape and pop off the solidified plastic before doing the second one-half. And then Doodle the ii halves together to create each trunk part.

Step 4
Gather all body parts by Doodling them together. You can Putter apartment parts and adhere them or but build upwards onto the bones shape to create protruding parts like ears and toes. Add details like facial features directly onto your piece and play with textures for fur or hair.

Experiment with some special techniques
To give your designs that actress flare, have a go at 1 of the post-obit techniques, or come up up with your own!

Brand a Tassel
Take a look at this tutorial and learn how to thread your own tassels with extruded plastic and a piece of cardboard. Tassels are a great improver to keyrings, jewelry, or even home decor items!
Teach Me

Layer Upward
This Holiday Wreath tutorial is a great instance of how you can make something impressive through a simple layering technique.
Teach Me

Broil to Perfection
Ever wondered how some 3D pen creations have a shine and glossy finish? The secret is baking? Find out how in this DIY Earrings tutorial.
Teach Me

Upcycle Leftover Plastic
This technique doesn't involve using yours 3Doodler to Doodle, only you can certainly use it to add finishing touches! Instead, information technology shows you how you tin can transform the leftover plastic from your projects into something beautiful.
Teach Me
Source: https://learn.the3doodler.com/about/how-to-draw-with-a-3d-pen/
0 Response to "how to draw 1d in 3d"
Post a Comment